As a little girl, I dreamed of my wedding dress being covered in jewels. When I got older, I realized that probably would not happen. Unlike Cinderella who had a God Mother, I would have a budget that would limit the amount of sparkle I could have, or so I thought.
Watch a video how-to of this project
My first task was to find a wedding venue that spoke to me and I could afford. As luck would have it, my past intervened and I rediscovered a country church that was located at my 6th grade camp. Oh, the memories. But after looking at the rustic nature of the setting, I questioned how I could have sparkle in such a rural setting.
As my future husband and I talked, he reminded me of something that he loved about me and that was my duality. In short, it was the yin and yang of my personality that he first fell in love with. What do I mean by that? Well, I am the girl that showed up to prom in a formal, diamond earrings, and cowboy boots. Why would my wedding be any different?
Since I am a DIY girl, I decided to decorate the church myself. I really wanted to keep the rural feel of the church, which meant candle light and the sparkle of jewels or at least cut glass. While the church squished the idea of real burning candles, they were fine with battery operated light.
But what to do about the sparkle?
I knew I wanted to create items for my wedding that I could keep. I was making my bouquet out of old lace and jewelry from my mother’s and grandmother’s jewelry boxes. Both of them have passed and this bouquet would give me a way of having them there with me. While I did have sparkle there and on my dress, I wanted to have something that the candle light could glisten off of.
At this point, I needed to walk away and regroup. In doing so, my future husband and I took a day trip to a favorite historical site of mine. While I was walking around and listening to the tour guide, my dilemma was solved.
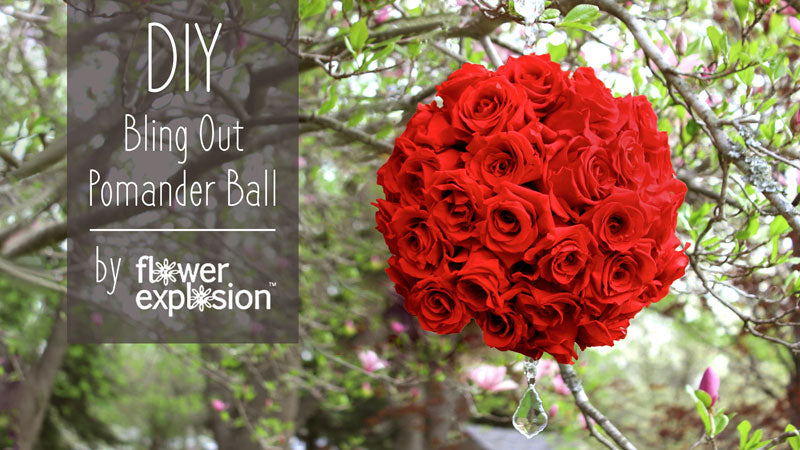
The tour guide was talking about how people in the past dealt with odors. One approach was to hang pomander balls, which would be scented with spices and flowers. While I listened to the story, the tour guide directed our attention to an example of one hanging below a beautiful chandelier. I thought, that is it! I was going to create my own pomander ball with bling, which would twinkle in the candle light.
Create Your DIY Rose Pomander Ball
To begin the process of creating your Rose Pomander Ball, start with getting your supplies together.

- one 5.7 inch Styrofoam ball
- a rubber band or string
- scissors
- 6 feet of crystal chain
- a package of hairpins
- 48 Flower Explosion Preserved Roses
- hot or low temp glue gun with extra glue sticks
- jewelry pliers or wire cutters
- you may also want a saucer or cardboard, a bowl with water, and hand pruners

Once you have your supplies, the next step is to remove the plastic wrap from the Styrofoam ball. To make placing your chain easier, you will need to mark the north and south of your ball. While you can just eyeball it, a better approach is to create a visual line. This can be done by placing a rubber band around the ball. If you do not have a rubber band large enough, do not worry just use a string.
After you have your guide established, mark the location of north and south on your ball with a hairpin. Do not push the hairpins flat into the ball. You want some to stick out so that you can see it. After that is done, cut the rubber band or string to remove.
The next step is to prepare the flowers. Flower Explosion Preserved Roses are packaged in clear plastic containers. The roses are not in these containers loose instead they are secured into the package with little straight pins. To release the roses, open the packaging and remove the straight pins from the bottom of each rose. This will make removing easier.

After the roses have been removed, take the straight leg of one hairpin and turn it sideways. Place the hairpin through the hole in the rose stem from the straight pin. Push it through until you reach the curve in the hairpin. Turn the hairpin until it is straight up and down. You have now created a DIY rose pick. Repeat this process until all roses are done.
Now, plug in your glue gun and the nozzle on a saucer or cardboard. This will keep the work surface clean. Also, place the bowl with water on the work table. The reason for this is safety. This project does require the use of hot glue, which burns. In doing so, having a small bowl of water nearby can sooth any area that may get glue on it.
[su_note]Also, as far as the glue goes, you have noticed that low or high glue was listed as a project need. Some hot glue is so hot that it will melt the Styrofoam ball. If you find that this is happening, change over to a low temp type of glue or just use the DIY rose picks without glue.

Once you have all your DIY rose picks created and your glue gun is hot, the next step is to begin attaching the roses to the ball. To do this, one can simply start attaching the DIY rose picks to the ball in rows that can go around or up and down. Another approach is to simply begin to add the DIY rose picks in any pattern you would like.
Regardless of which technique you choose, the key is to take the hairpin and push it into the ball. The height of the rose will be determined by how far you push the hairpin into the ball. Once you are happy with the height of the rose, you can leave it or secure it more to the ball with a little hot glue. Continue with this process until the ball is almost completely covered.

After you reach that point, it is time to attach the top and bottom chain. The best approach is to test different lengths of the chain for the top. Once you have found the perfect length for your need, you can cut the link or simply undo the link. Next, fold the chain in half and run a hairpin through the two links at the bottom of this fold. Push the hairpin into the ball. Add a second hairpin going in the opposite direction if you like for extra support along with a dab of hot glue.

Repeat this process for the bottom chain.

Continue placing the DIY rose picks to the ball until it is completely covered.

After the ball has been completely covered, you are ready to hang up and enjoy.
As beautiful as this DIY Bling Out Pomander Ball is, I do have two suggestions that I learned while I was creating this design:
- If you are a afraid that a little of the white from the ball will show through, consider gluing a thin layer of moss on the ball before covering with the DIY rose picks.
- Consider where you plan to use your pomander ball. The reason I say this is if you plan on using it outside and you use hot or low temp glue, you are running the chance of the heat of the day softening up the glue. This in turn could cause your flowers to loosen up and maybe fall. If you do plan on using it outside, I would use a tacky type of glue that is not sensitive to temperatures.
Finally, once your special day is over and you want to display your Pomander Ball, make sure that it is in a location where it does not receive direct sunlight. Following these tips will keep your ball looking like you just created it.
Would you like to watch a video tutorial of this project?